
What cards are for
Cards turn a routine email into a moment. Organisations use them in quite different ways.
A church or charity thanks hundreds of volunteers after a conference, each receiving a letter from the leadership with their own name written on it.
A members club welcomes new members with a branded welcome card, and marks every member's birthday with a card showing their photo.
An alumni association sends season's greetings to its whole membership, each envelope addressed to the individual.
A school or training provider congratulates students on completing a course, with the card as the payoff and the email as the teaser.
A business thanks its customers at the end of the year, or marks a client's anniversary of working together.
Part 1: Birthday cards
1. How birthday cards work
Previously a birthday email was simply the text you typed as your birthday message. You can now choose a designed birthday card to go with it. Each card is generated for the individual contact, carrying their name, their photo where you hold one, and your logo, so every member receives a card that is personal to them.
Cards are generated live for each contact when they are viewed, so they are always personal and shareable, and are never stored on our servers.
2. Choosing a design
Go to Settings > Main settings > Email settings > Birthday & Anniversary Settings. Under Birthday Card Graphic you will see four options, each with a live preview using your own logo.
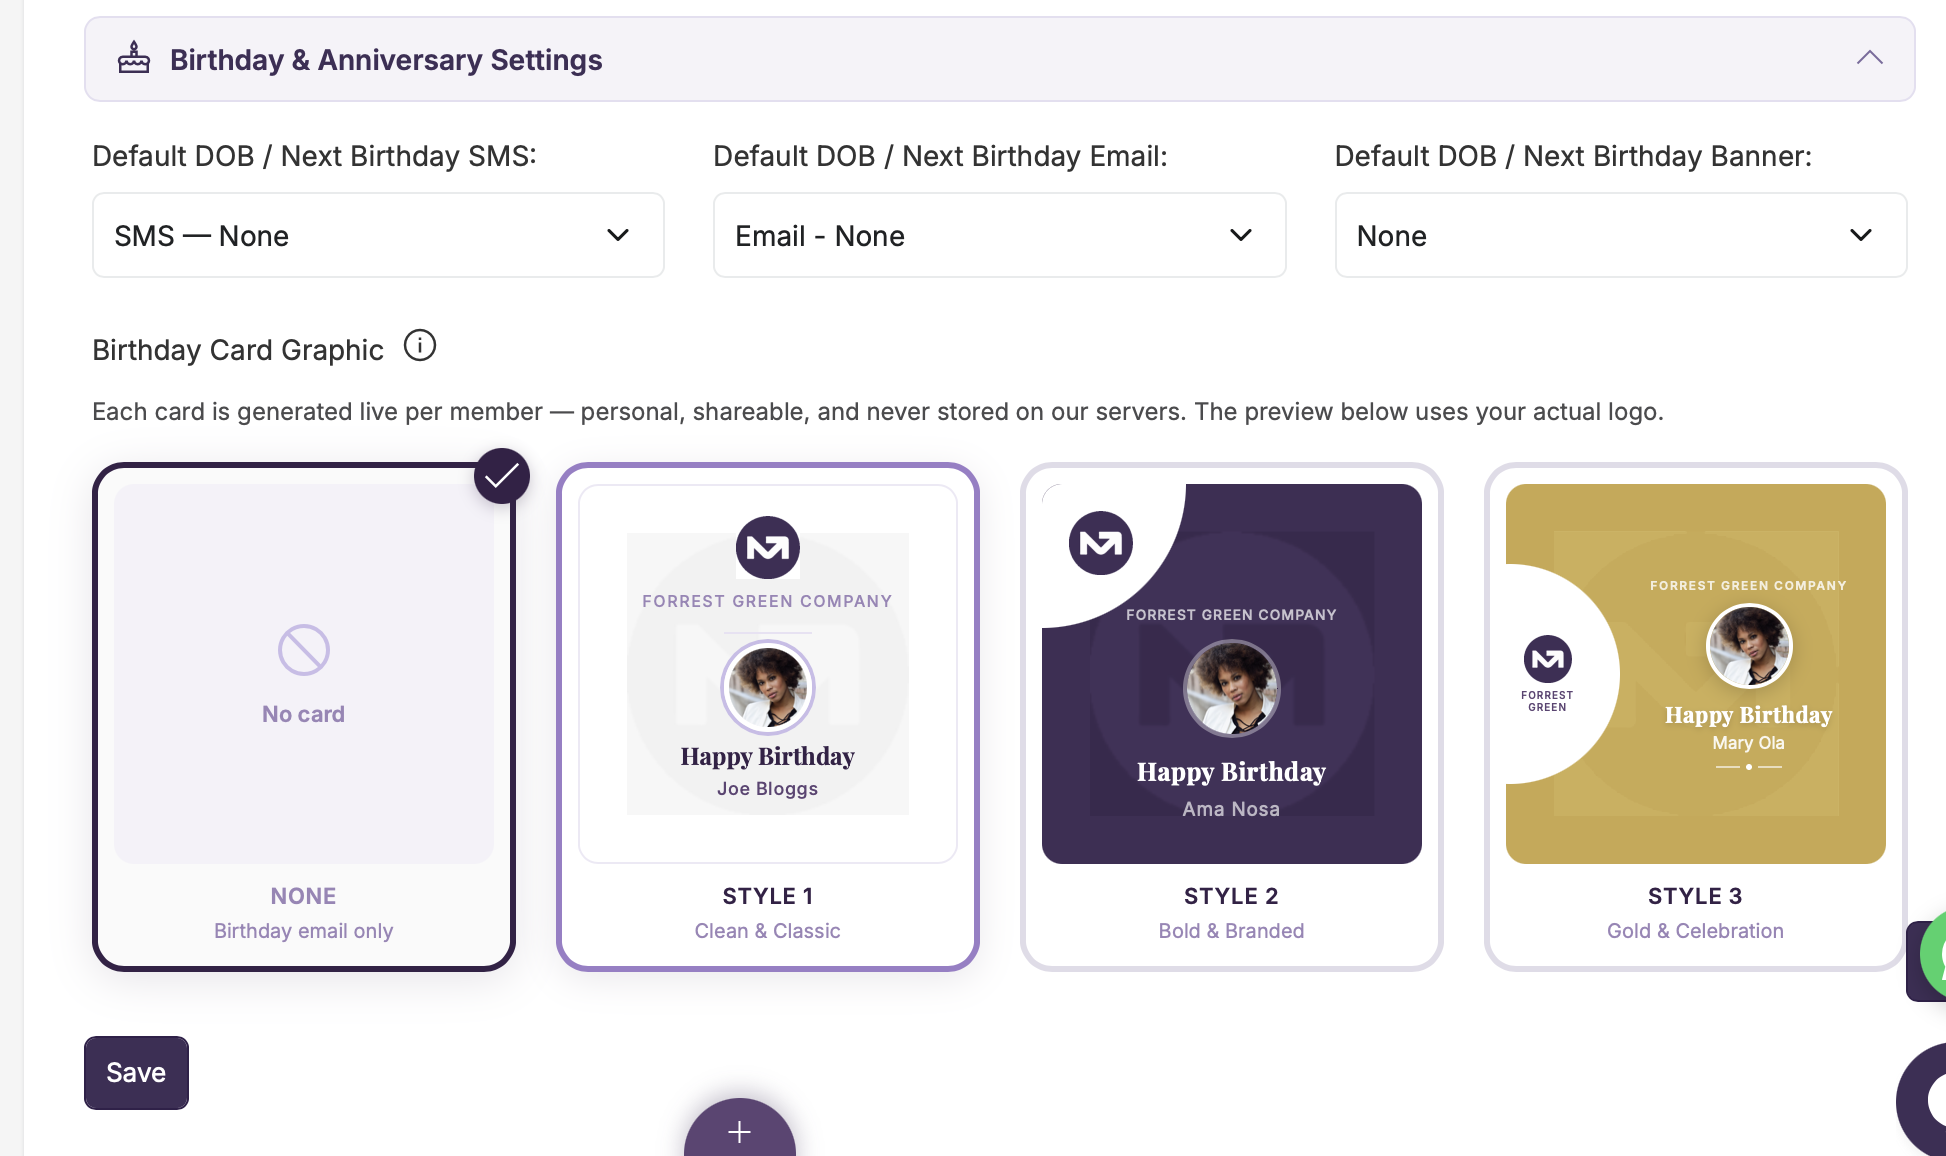
None. The birthday email is sent with your message only, as before.
Style 1: Clean & Classic. A light, elegant card with your logo at the top, your organisation's name, the member's photo, and "Happy Birthday" with their name.
Style 2: Bold & Branded. A rich card in dark purple with your logo prominently placed, for a confident branded feel.
Style 3: Gold & Celebration. A warm gold card for a more festive, celebratory feel.
Click the design you want and press Save. You can change it at any time, and the next birthday email will use the new design.
3. Who receives a birthday card
Birthday cards go to contacts whose date of birth or birthday you have stored on their contact record. Contacts without a birthday on file are not included. If you hold a profile photo for the contact, it appears on their card. If not, the card is still sent without a photo.
On the same settings screen you can also choose your default birthday SMS, birthday email and birthday banner, so the card, the message and any SMS all go out together.
Part 2: Cards in your emails
4. What the recipient sees
In the email itself, the recipient sees "For:" followed by their name, a View the card link, and a large envelope with their name written across it and your logo as the stamp. The whole envelope is the link. Underneath there is a plain text link as well, in case their email app blocks images.
Tapping it opens a page branded to your organisation, where the envelope appears, the flap opens and your card rises out. The page shows a small Card created on My Centre Office (MyCo) badge once the card has opened.
Every recipient gets their own envelope and their own private card link. The link is generated from a long secure code and cannot be guessed, so one person cannot open another person's card.
5. Adding a card to an email
Compose your email as normal, then open the Card tab alongside Body, Recipients and Send Test Email. The card page walks you through it in numbered steps, with a short explanation at the top of how it works.
Give the card a name first. Only you see this, and it helps you find the card again to reuse on another email.
6. What goes inside the card
Choose one of two options.
Type a message. Enter a card title and a card message, and the card is styled for you. You can personalise the title with {{firstname}} and {{lastname}}, so "Thank you, {{firstname}}!" becomes "Thank you, Jane!" for each person. Think of your email as the teaser, and the card as the payoff.
Upload my own design. Upload a letter or card you have designed elsewhere, as a PNG, JPG or PDF. This is ideal where the card has already been designed by your team or a designer.
7. Writing each person's name on your design
If you upload a PNG or JPG, MyCo can write each recipient's name onto the design itself, so a letter that begins "Dear" reads "Dear Jane," for Jane and "Dear Tunde," for Tunde.
To do this, leave a gap in your design where the name goes, for example straight after "Dear", then tick Yes, write each recipient's name on the design and follow the three short steps.
Set the text and style. Choose the text to write, for example {{firstname}}, so the comma follows the name. Then pick the font, size, alignment and colour to match your design. A size of around 2 to 2.5 suits normal letter text.
Click the design where the name should start, on the line the letters sit on. A red dot marks the spot and a guide shows roughly how the name will look.
Check it with Exact preview, which shows precisely what recipients will receive, using a sample name you can type in. Adjust and preview again until it looks right, then save.
A few tips. Names cannot be written onto PDFs, so export your design as an image if you want it personalised. When sending to a large number of people, a JPG keeps things lighter and faster than a PNG, with no visible difference in quality. Long names shrink automatically to fit the envelope, but do leave enough room on your design for a longer name.
8. The envelope in your email
Choose an envelope colour, either from the colour picker or by typing a colour code. The preview beside it updates as you change the colour, and you can type a sample name to see how it looks. The same colour is used for the envelope that opens on the card page.
Your organisation's logo is used as the stamp. If you would prefer your own envelope graphic, open Use my own envelope image instead and upload a PNG or JPG. The recipient's name is then written across the middle of your image.
9. Card page background
Optionally, upload an image to appear behind the envelope on the page where the card opens. Leave it empty for a clean light background.
10. Previewing and testing
Preview the card page shows the page recipients see when they tap the envelope, complete with the opening animation, using the sample name Jane Doe.
The best check of all is a test email. Save the card, go to Send Test Email, and send one to yourself. The test includes the card exactly as recipients will get it, with the name you use for the test written on the envelope and on your design.
11. Reusing a previous card
You do not need to rebuild a card you have used before. At the top of the Card tab, open Reuse a previous card. Your most recent cards are listed with a thumbnail, their name, the type of card and when they were sent. Use the search box or Show all to find older ones.
Click Use this card and everything is copied into the email you are working on: the content, your design, the name placement, the envelope colour and the background. You can still change anything afterwards, and the original card is not affected. If the email already has a card, you are asked to confirm before it is replaced.
12. After you send
Each recipient is sent the email with their own named envelope and their own card link, exactly as your test showed.
The delivery report you receive shows the email as you composed it, with a sample envelope reading "Recipient's Name" in place of the card. This is deliberate. It shows you what the card looks like without exposing any individual recipient's personal card link.
13. Removing a card
To take a card off an email before it is sent, use Remove Card at the bottom of the Card tab. You are asked to confirm first. Recipients who have already received a card from an earlier send are not affected, and their card page keeps working.
MyCo Cards : a personal touch, delivered to every recipient